Server monitoring with Telegram
INFO: Those who already have a Telegram Botfather Token and want to skip the intro can directly access the Github Repository
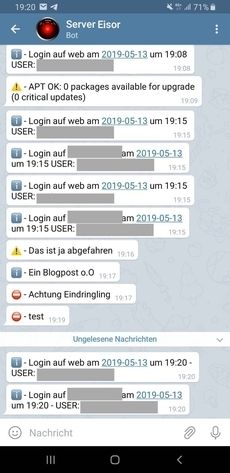
At the end of this intro, you will have logs like this:
Step 1: Create Telegram access token with Botfather
Open this link on your computer or phone: https://telegram.me/botfather and click on Send Message. You need telegram installed on your computer or phone. A new windows will open. Type in /start and send the message. After that, some available commands will be shown. Send /newbot in order to crate a bot and set a unique name as requested by the bot. An access key will be shown to you if everything works out:
> [...]Use this token to access the HTTP API: 123456789:AAEHUDJAN[...].Now switch to the chat and write a message. A simple Hi is sufficient. Now we need to find our the ChatID. This can be done by opening this url:
> https://api.telegram.org/bot[ACCESS-TOKEN]/getUpdatesThe output should like this:
{"ok":true,"result":[{"update_id":123456789,
"message":{"message_id":3,"from":{"id":123456789,"is_bot":false,"first_name":"Ralph","language_code":"de"},"chat":{"id":987654321,"first_name":"Ralph","type":"private"},"date":1558263909,"text":"Hi"}}]}
The id that is shown here will be important in the next part.
Step 2: Prepare server
Clone repository and setup
ahmet@server1:~$ git clone https://github.com/ahoz/Telegram-Server-MonitoringAdapt api key and chat id in monitoring.py. Insert your disk name in checkdisks and change the settings as you want.
Step 3: Start monitoring
In order to monitor user logins the /etc/profile file needs to be adapted.
ahmet@server1:~$ echo "/opt/monitoring.py 1 >/dev/null 2>&1 ">> /etc/profileAdditional cronjobs are needed to monitor everything regulary
ahmet@server1:~$ echo "0 */2   * * *   root    /bin/bash /opt/monitoring.py 2 >/dev/null 2>&1" >> /etc/crontab
ahmet@server1:~$ echo "0 */2   * * *   root    /bin/bash /opt/monitoring.py 3 >/dev/null 2>&1" >> /etc/crontab
Executing the scripts with user root will always work. It is recommended to change this user to a non privileged user. I also want to emphasise that this script is developed in a short spare time. It should be polished before using it on a production environment.